Easy Marble Effect Painting: Simple Swirl Techniques
The Art of Marble Effect Painting: Understand and Master the Swirl Technique
Have you ever been captivated by the opulent look of marble, but found it too costly? You are in for a treat! Achieving fantastic marble effects with paint is much simpler than you might expect.
I've been practicing with imitation finishes for quite some time, and I genuinely love marble painting. The best part is, you don't need to be an artist to make a beautiful masterpiece.
Why is Marble Effect Painting So In-Demand?
Marble effect painting turns everyday surfaces into luxurious points of interest. It's cost effective and incredibly adaptable.
You can apply this technique to walls, furniture pieces, photo frames, and even small decor elements. The possibilities truly are limitless!
Contrary to popular belief, marble painting doesn't necessitate professional abilities. With the appropriate methods and some practice, anyone can craft this beautiful finish.
Must-Have Supplies For Your Marble Effect Artwork
Before we dive into the exciting part, let's assemble your tools. You very likely have most of these already.
Painting Supplies Needed are: - A base coat of paint (mainly white or light gray) - 2-3 darker shades for veining - Acrylic paints are best suited for beginners - Fine tipped artist brushes - Sea sponges or typical kitchen sponges
Additional Equipment: - Feathers (either real or synthetic) - Cling wrap or cheesecloth - A spray bottle filled with water - Paper towels - Drop cloths for safety measures
Don't fret if you don't possess everything on this list. The beauty of marble effect painting lies in its versatility.
Professional Tips for Surface Preparation
Establishing good preparation is crucial for impeccable final results. Professionally speaking, this step is non-negotiable!
The initial stage involves thorough cleaning of your surface. Ensure any dirt, grease, or flaking paint is removed.
Gently sand any rough patches with a fine-grit sandpaper to assist with the adhesion process.
If you're attempting to cover a dark or glossy finish, a primer treatment is required. Let it dry thoroughly before proceeding.
Let's Create Basic Marble Effect with Swirl Technique
Now comes the thrilling part - bringing your marble effect to life! This technique is tolerant and perfect for beginners.
Step 1: Applicate Your Base Coat
Opt for a light base color that resembles the hue of natural marble. White, cream or light grey works marvellously.
Ensure that the base coat is applied uniformly using a roller or a paintbrush. Perfection isn't vital here - slight irregularities can enhance the final look.
Ensure that this layer is completely dry before proceeding. Skipping this step can disrupt the marble effect.
Step 2: Develop the First Layer of Veining
Combine your first accent color with a bit of water. Aim for a slightly translucent, rather than opaque effect.
Dab a damp sponge into the diluted paint mixture. Excess paint should be blotted onto paper towels.
Gently blot the sponge across your canvas in random, organic patterns, mimicking the natural flow of marble.
The key is to work rapidly while the paint is still wet. This allows the colors to blend flawlessly.
Step 3: Add Intricacy with Additional Colors
Pick a subsequent, slightly darker color. Carry out the same sponging process, albeit with less coverage this time.
Focus on enhancing the depth of the veins created in the previous step. Avoid covering your entire surface.
Areas where colors converge should be softly blended. This will emulate the natural transition seen in marble.
Advanced Swirl Techniques: Delving Deeper
Are you eager to take your marble effect painting skills up a notch? Follow these techniques for a more realistic finish.
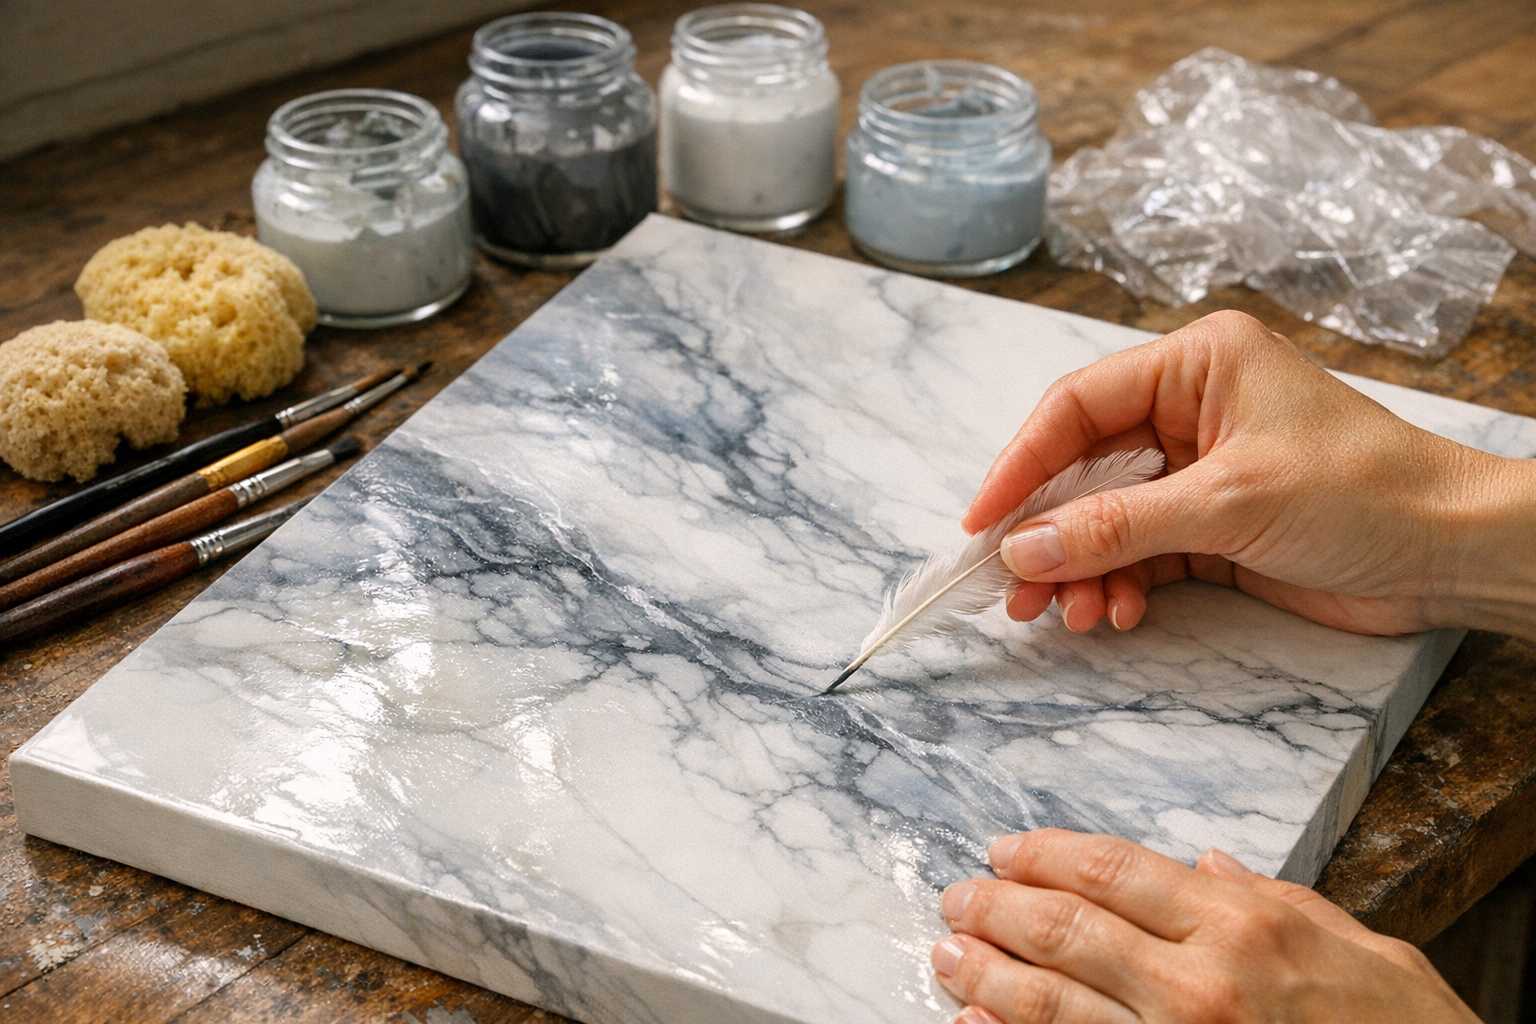
The Feather Method
Feathers effortlessly emulate the veining seen in marble. Here's how to use them efficiently.
Activate a feather by dipping it in diluted paint. Run it across your surface in flowing, uneven lines.
Vary your feather's pressure throughout the process. Light strokes will yield faint veins, while heavier strokes effect striking veins.
Occasionally rotate the feather to naturally alter the width of the lines.
Unwrap the Magic of Plastic Wrap
Crumpled plastic wrap subtly adds texture variations. This technique lends nuanced depth to your marble effect.
Simply press crumpled plastic wrap onto the wet paint. To avoid smudging, lift it straight upwards.
Always use a clean segment of plastic wrap for every application to prevent muddling of colors.
The result will be an organic texture that flawlessly mimics marble.
Color Combinations to Enhance Your Marble Effect
Picking the right colors can make or break your marble effect painting. Let's look at some tried-and-true combinations that work like magic!
Classic White Marble: - Base: Pure white or cream - Veining: Light gray and charcoal - Accent: Muted blue-gray
Dramatic Black Marble: - Base: Charcoal or black - Veining: White and silver - Accent: Gold highlights
Warm Beige Marble: - Base: Warm beige or tan - Veining: Rich brown and taupe - Accent: Cream highlights
Don't hesitate to experiment with unusual hues. Some of my best results have come from unexpected mixtures!
Common Mistakes to Evade
Throughout the years I've learnt from my mistakes. Heed my advice to save you a headache!
Mistake #1: Rushing Through Patience is key. Rushing can lead to muddy colors and unnatural patterns.
Mistake #2: Overusing the Paint Subtlety is the secret with marble effect painting. It is easier to add more paint than to remove excess.
Mistake #3: Forcing a Pattern The beauty of real marble lies in its randomness. Avoid generating rhythmic patterns or overly symmetrical designs.
Mistake #4: Neglecting the Sealant Always make sure to seal your finished marble effect with an appropriate topcoat. This safeguards your hard work and guarantees durability.
Overcoming Challenges with Your Marble Effect
Things might not always go as planned. However, don't let concern get to you - most problems have straightforward solutions.
Problem: Muddy Colors If your colors are blending too much resulting in a muddy look, consider working with leaner paint and lighter strokes.
Problem: Unnatural Veining If your veining looks artificial, consider seeking inspiration from images of real marble. The flow of veins should vary both in width and transparency.
Problem: Rough Texture If the surface feels rough, slightly sanding between coats using a fine-grit sandpaper usually fixes texture issues.
Protecting Your Masterpiece: Sealing and Conservation
To ensure that your marble effect painting stands the test of time, it should be properly sealed. The correct sealant can keep your wonderful finish in top condition for years.
The choice of your sealant should be dictated by the location of the surface. Surfaces that see high traffic need sturdy polyurethane finishes.
For decor objects or walls in low-traffic areas, acrylic sealers are ideally suited.
Sealant should be applied in thin, even coats. Several thin coats are better than a single thick one.
Envision Your Next Artistic Venture
Once you've perfected the basic method, the possibilities for your creativity are endless. Let's explore some of my favorite project ideas.
Furniture Transformation: Breathe new life into old furniture with stunning marble effects. Coffee tables and chests of drawers turn out particularly gorgeous.
Accent Walls: Introduce dramatic focal points with marble effect accent walls. They look wonderful as a backdrop for beds or dining room tables.
Small Decorative Accessories: Hone your skills on objects like picture frames, vases or wooden boxes. They also make delightful gifts!
Bathroom Update: Marble effect painting works exceptionally well in bathrooms if adequately sealed. Consider upgrading vanity tops or wall sections.
Final Words for a Successful Outcome
Harnessing the art of marble effect painting improves with practice. Don't aim for perfection on your initial attempt.
Start off with small projects to build your confidence and sharpen your skills. Gradually take on larger surfaces once you feel ready.
Ensure you take timely breaks during larger projects. Fresh eyes can help you spot areas in need of adjustment.
Above all, enjoy the process! The relaxing, creative aspect of marble effect painting is part and parcel of the reward.
Remember, like every section of real marble, your faux marble effect will be one-of-a-kind. Embrace minor flaws - they add character to your project.
Now gather your supplies and get ready to create stunning marble effects. You'll be astounded at what you can achieve with these straightforward techniques.